![]()
SECTION 1: Create an Individual Employee Registered Visitor Record
You may pre-register Employees with a sign in code for an easier sign in / out. The sign in method can be either:
• Scan with Smart Phone (sign_in_method = Phone)
• Scan with QR Code or PIN Code (sign_in_method = QR Badge or PIN)
To see the procedure for doing a bulk upload, click here.
To create a single Registered Visitor record for a “Phone” and/or “QR Badge or PIN”…
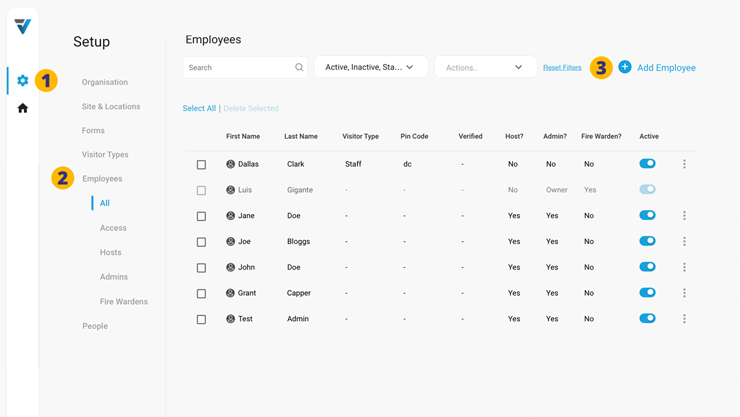
1. Go to your Admin Setup page (cog icon).
2. Select Employees.
3. On the right hand side, select Add Employee.
A sidebar will appear on the right hand side…
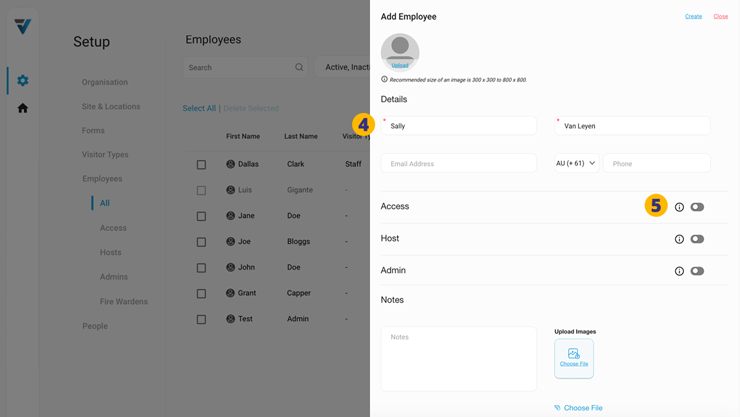
4. Enter the person’s First Name and Last Name.
5. Toggle the Access Function on.
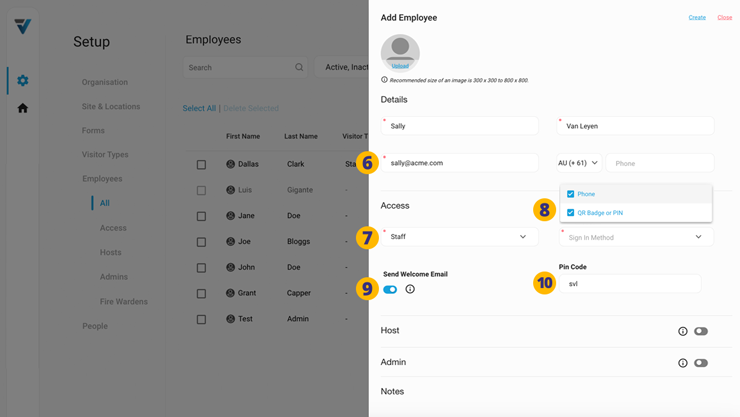
6. Enter an email address (required).
7. Set your Registered Visitor Type to one of the ones you created in the Visitor Type page. If nothing is listed, create a Registered Visitor Type by referring to this help article (paying particular attention to Step 16).
8. Set Sign In Method to either “Phone” and/or “QR Badge or PIN“.
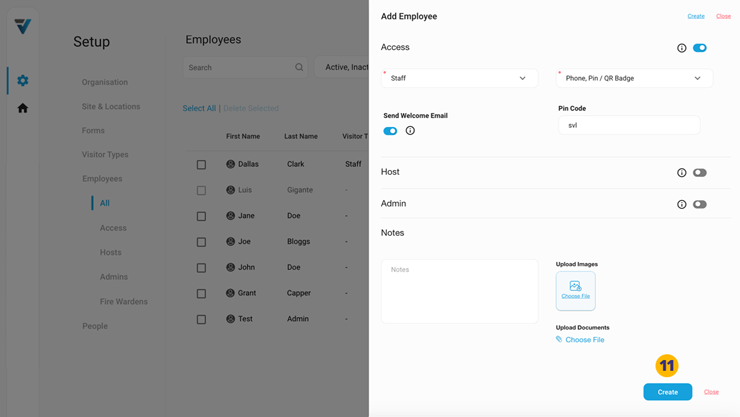
9. If you wish the new Registered Visitor to receive a welcome email on how to do a “Phone” and/or “QR Badge or PIN” sign in at your premises, slide the toggle switch on and enter in the person’s email address.
If both Sign In Methods are checked (in step 8), two emails are sent with the following subjects:
- Welcome to VPass (Phone Sign In)
- Welcome to VPass (Pin Code / QR Sign In)
The content of the email details preliminary steps to do before a first sign in.
- The Phone Sign In Welcome email looks like this.
- The QR Badge or PIN Sign In Welcome email looks like this.
10. If using “QR Badge or PIN” as a Sign In Method… set a unique code – something memorable like initials, an ID number or mobile phone number is ideal.
11. Scroll to the bottom of the page and click “Create”.
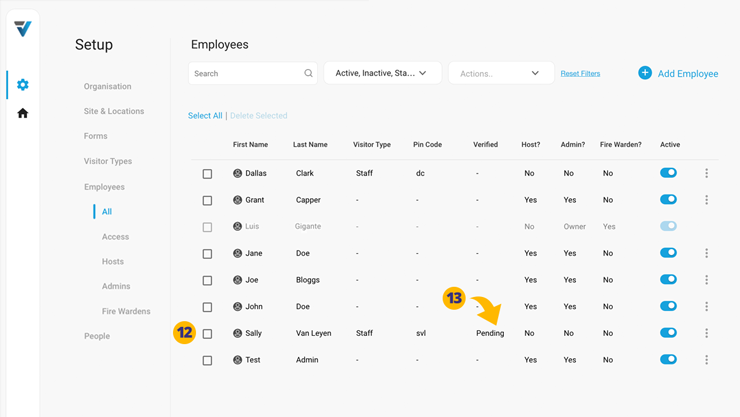
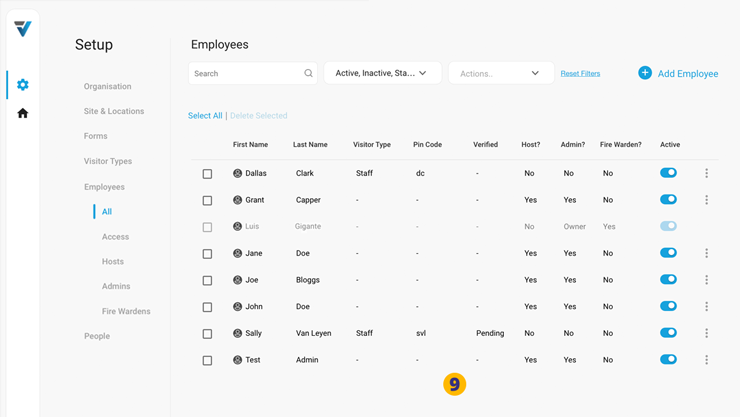
12. The new record appears on the Employees list page.
13. Note that the Verified column says “Pending”. This means that this particular Registered Visitor has not yet clicked on the link in their welcome email and created a login for their Phone Profile. Once this is done, the column will say “Yes”.
Section 2: Bulk Upload of Employee Registered Visitor Records
Go to your Admin Setup page (cog icon) (1).
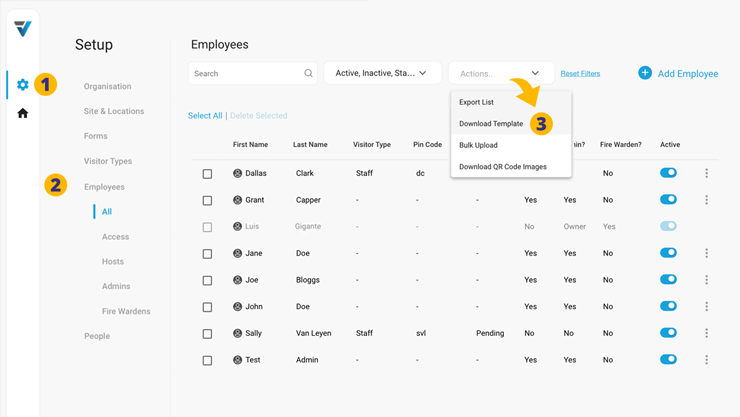
2. Select Employees.
3. From the Actions drop down menu, select Download Template.
Alternately use the .xlsx file here as a starting template.
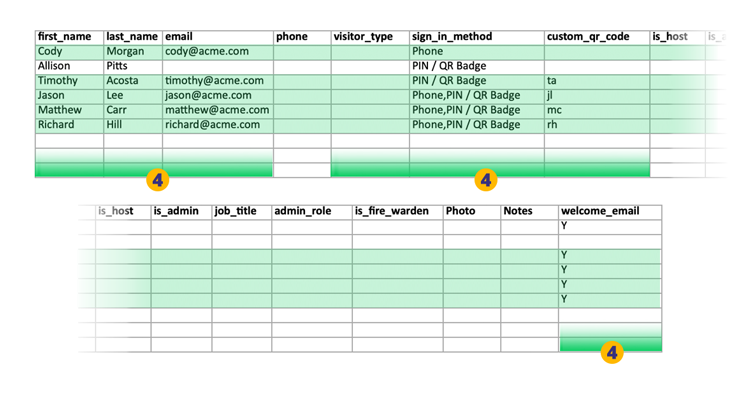
4. To do your bulk upload of Employees the following columns marked in green (in the image below) need to be populated…
• first_name (required)
• last_name (required)
• email (required even if Y is not entered in the welcome_email column)
Access Function…
• visitor_type (required… enter a Registered Visitor Type name here*)
• sign_in_method (required – enter “Phone”, “PIN / QR Badge” or “Phone,PIN / QR Badge”)
• custom_qr_code (specify a PIN / QR Badge code. If left blank the system will generate a random six digit code PIN / QR Badge code.
• welcome_email (optional enter “Y” if wishing to send welcome email(s) to the Registered Visitor – see point 7 above)
* More on Registered Visitor Types here (paying particular attention to Step 18)
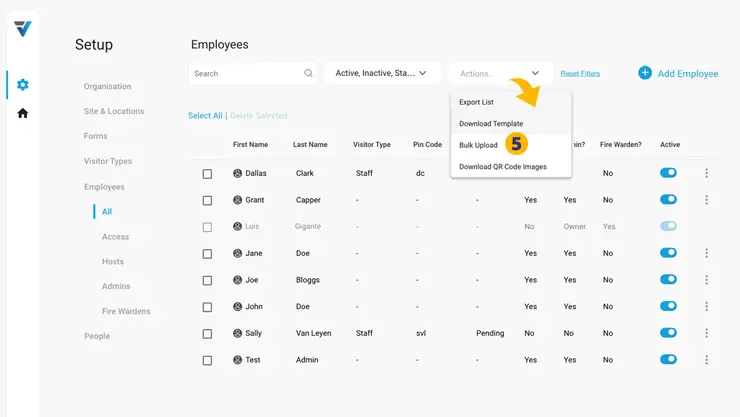
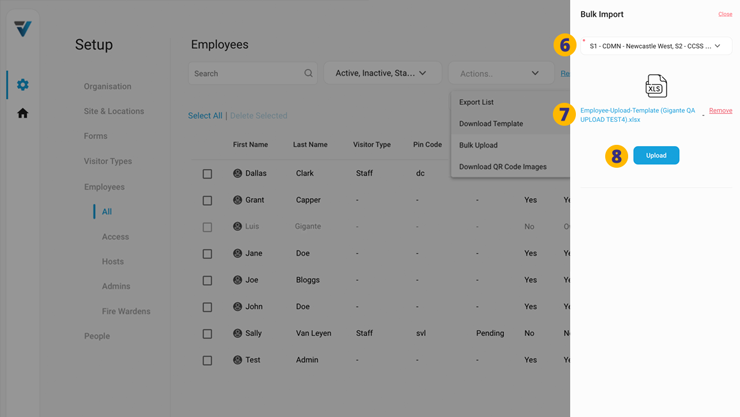
Once your .xlsx file has been prepared, upload it by going to Actions > Bulk Upload (5).
6. Select the Site(s) where these Employees will be able to sign in.
7. Upload the filled .xlsx file.
8. Click Upload to complete the process.
9. Your records will appear in the Employees list page.
Kiosk Sign In & Out
Signing in and out at a Kiosk is done with a printed QR code or manually entering a PIN code.
To download QR code images for each record, you may firstly wish to filter your Employees list page to show only records with the Access Function (16).
Next, select the relevant records (17) and then go to Actions > Download QR Code Images (18 & 19).
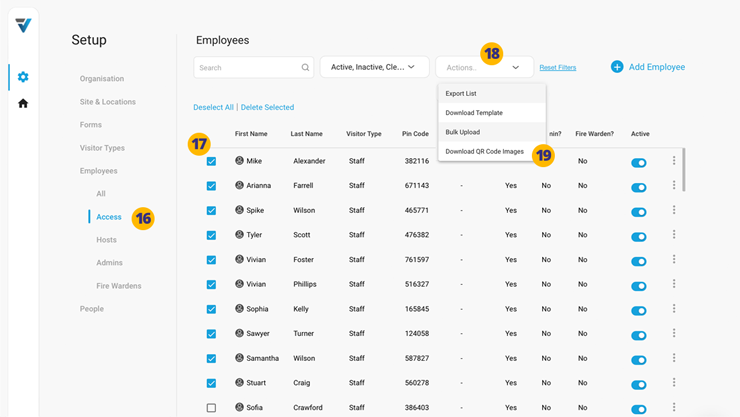
A Sidebar will come up on the right hand side. Select “Download All“...
![]()
Your image files can now be included on any badge artwork you might have or printed as a sticker for a phone case etc.
For a Registered Visitor to do an actual sign in at a kiosk…
QR Code Badge Sign In
If they have a QR coded badge, tap the black QR code button in the bottom left (20).
On the next page, a camera window comes up for scanning the QR code (21).
![]()
PIN Code Sign In
If they have a PIN code tap the black PIN button in the bottom centre (22).
On the next page, a field comes up for the entering of their code (23). To complete the sign in tap Sign In (24).
![]()
If no Form is specified for such Visitor Type then the sign in is completed immediately.
Registered Visitor Sign Out
At sign out, all registered visitors select the Sign Out button at the bottom right (25). This takes them to the Sign Out page where…
• QR Code badge users select the QR button on the left (26) to complete their sign out.
• PIN Code badge users select the PIN button on the left (27) to complete their sign out.
![]()
V3-075